.
.
MY CNC JOURNEY THUS FAR
“This shorter story emerges from my workshop, with its main focus on my recent decision to acquire a CNC machine.
What followed was a completely new encounter for me—one that unfolded step by step. Here, presented in chronological order, with numbered page headings, the story traces that progression as it happened, allowing the experience to come alive rather than simply be explained. Enjoy.”
~~~~~~~~~~~~~~~~~~~~~
“From a standpoint of personal sanity and retiree ‘peace of mind, I occasionally switch from my daily routine (of pretty much nothing beyond relaxing in my favourite chair) to venturing into my office, for a laid back, computer-based exploration of the vast digital aisles related to, especially, workshop paraphernalia. My daily perusal of woodworking tools of mainly Chinese origin includes Amazon, Vevor and my favourite Rabbit Hole – ‘Aliexpress’.
An added lure to these sites, especially when compared to Australian sources, is what might politely be termed their base pricing. Many of those manufacturers, once dismissed as mere ‘copycats’, have powered into a new era of highly regarded Research & Development. In addition to this ‘research’ activity, another favourite site, YouTube, also deserves appreciation for its incredible teaching prowess and the vast scope of this information ‘demon’…
One day, early in July 2025, I took an inquisitive but dangerous sidetrack from my oriental favourites… I clicked on a YouTube video that proclaimed its opinions as ‘the best’ regarding ‘desktop’ CNC machines currently available in 2025. Hmmm, what’s this about?
For the next 30 minutes, I endured the usual ratio of meaningless pleas for a ‘Like’ or ‘Subscription’ to the channel. For me, eager for their content but unwilling to commit, I watched politely but kept my mouse away from those buttons… Not yet. Firstly, they’d have to earn my input. This particular site dallied between a couple of minimum-footprint machines and some early U.S.-based offerings as it progressed from the seventh to its number one choice. The last two offerings caught my ‘mechanics’ eye as I allowed a stronger interest to develop.
The cheaper units were exactly what I feared: belt-driven everything, open-circuit steppers that could barely breathe under load, spindles that seemed to whimper more than spin, gantries that flexed if you so much as looked at them, and instruction manuals that should’ve included a complimentary guessing game. Company support? Long forgotten. No wonder the old advice echoes through every forum: “Buy your second machine first.” But then… There they were. Two boldly coloured contenders, each one ticking the boxes the cheap machines couldn’t. These two were designed with colour as ‘icing’ on a fairly expensive ‘cake’.
The two main contenders at this early stage in my burgeoning interest were;
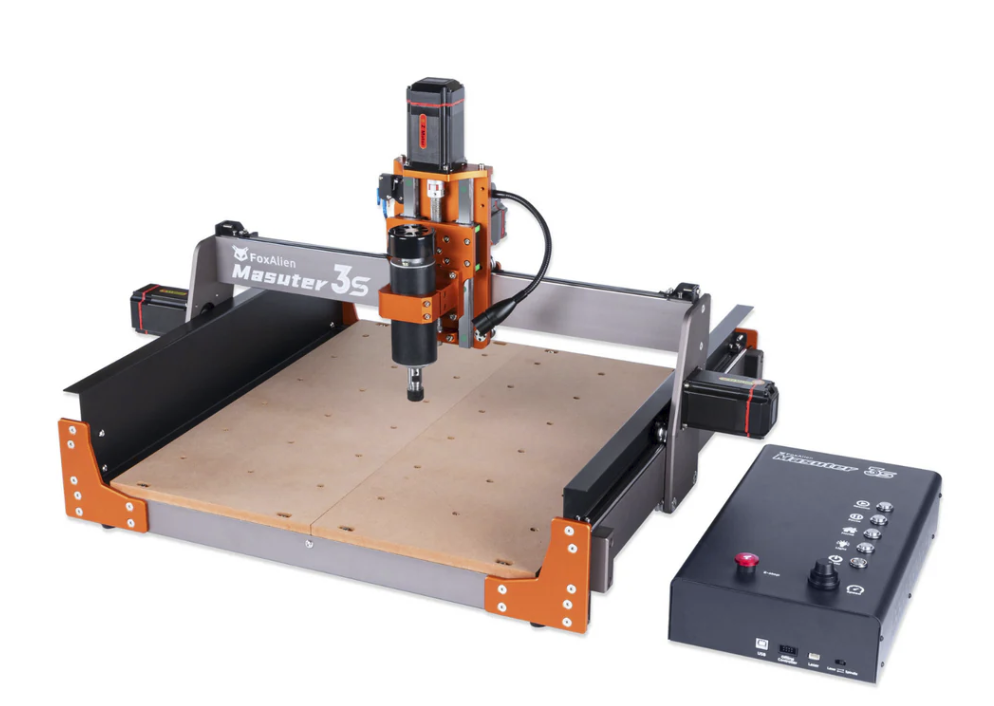
FOXALIEN Masuter 3s – The loud, proud, bright-orange beast.
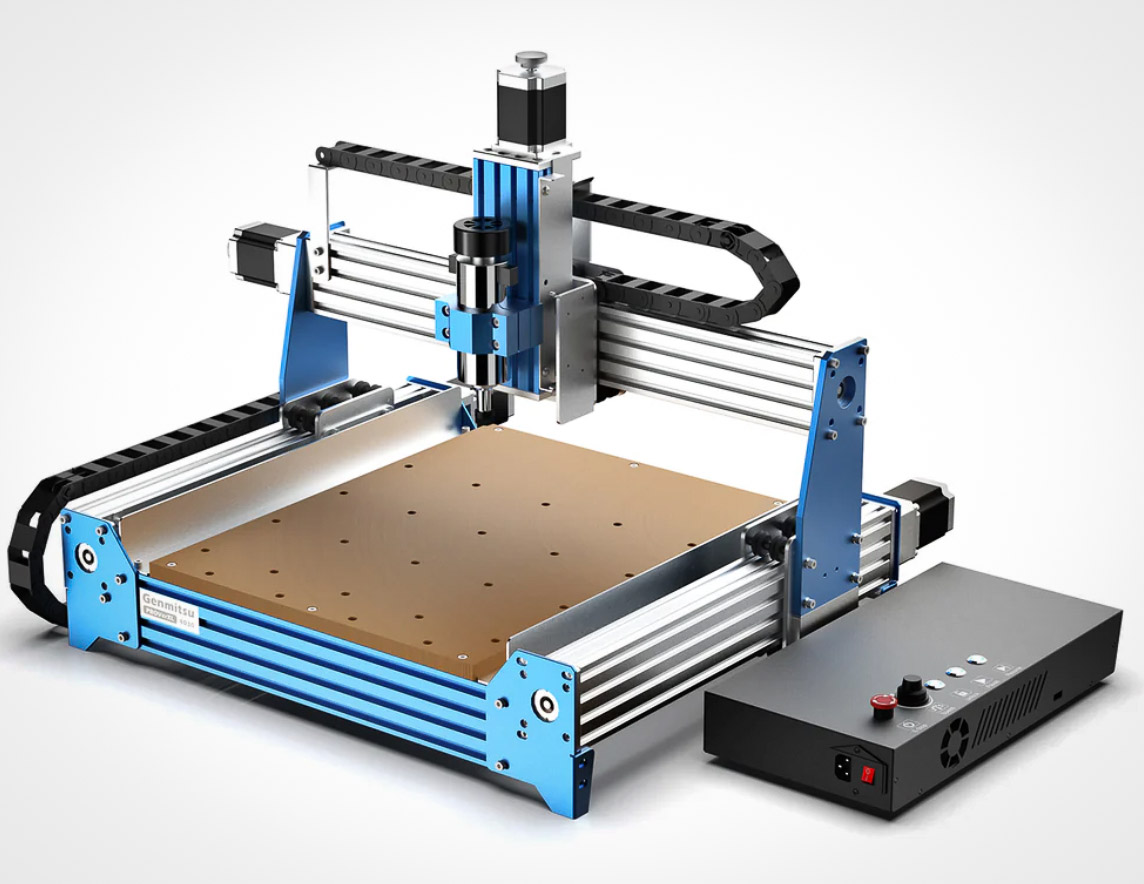
GENMITSU Prover 4030 XL – dressed in a very confident blue
And I’ll confess, one grabbed me for a very untechnical reason: that orange paint!
Looking beyond the ‘glitter’, both machines enjoy NEMA 23 stepper motors, lead screw X, Y and Z carriage movements with larger and stronger cross-section gantries, 400-watt spindles, a first-class instruction manual, and a highly rated company backup and parts system.
Each machine was also presented partially ready-assembled.
Over several weeks, as my interest piqued, I searched many web-based offerings of similar machines and then drifted onto the secondary CNC necessity of related software and control programs. I was surprised at the range and complexity of CAD / CAM software and the Windows / Mac variations within. Also, the so-called Grbl programs that control the CNC’s cutting and directional behaviours. My own biggest limitations, in this mainly Windows environment, were my personal adherence to Apple Mac computers, which I have been using for 15 very contented years. No, I definitely wouldn’t go back to my earlier 10 years of Windows owning and building computers.
CNCs…Well, I was hooked, I just had to have one!
~~~~~~~~~~~~~~~~~~~~~
MY CNC JOURNEY THUS FAR….(Continued p2)
A CNC Needs A Software (Engineer?)
“As with life in general, you make a choice, and you pay a price.”
A few weeks later, I succumbed to an upgraded version of the Genmitsu, which they called the ProverXL 4030 (version 2).
I made my choice and, from a flinching budget, sent my money off to Amazon Australia.
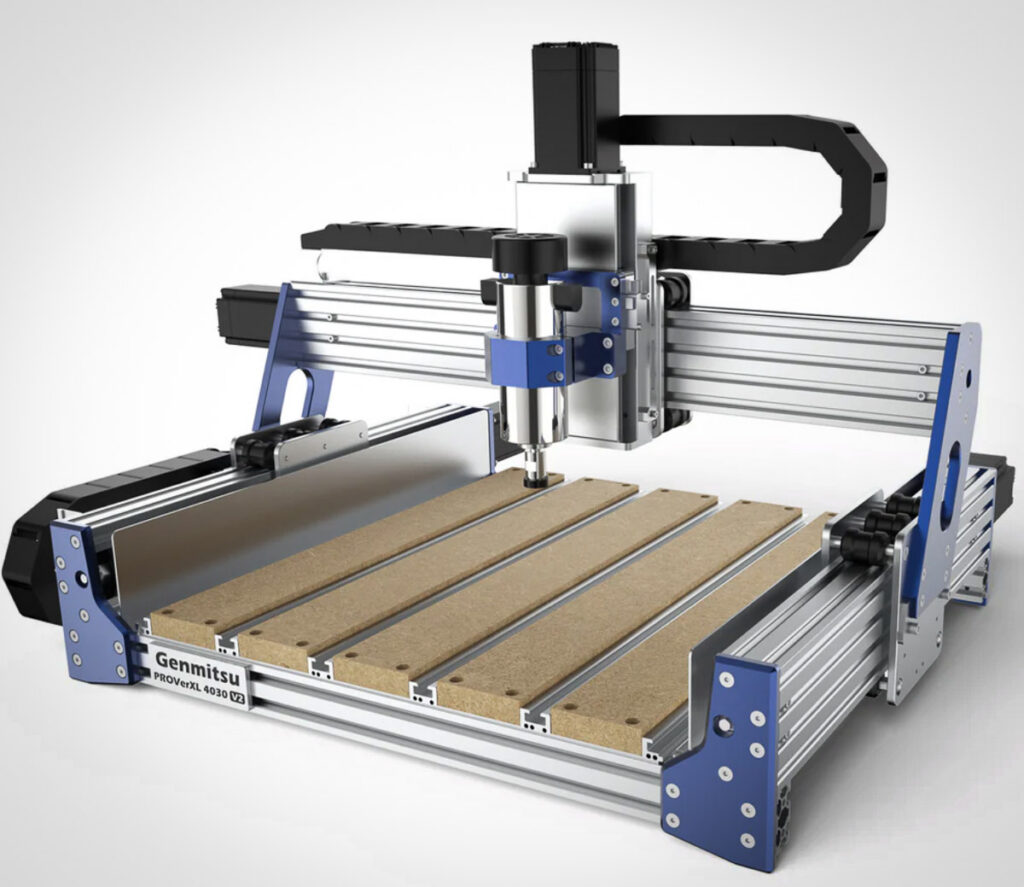
This upgraded version has a more rigid framework for greater stiffness (read: more cutting accuracy), closed-circuit stepper motors, more accurate Ball Screws, and a spoil board with five T-bolt tracks for better clamping of workpieces. (After five weeks of intense learning, I realise my thoughts have become a tad jargon-oriented…Sorry).
In the few days of impatiently awaiting the arrival of my new machine, I intensified my research into all things CNC and became aware of the enormous learning curve that lay ahead.
1. CAD, or Computer Aided Design, allows you to sketch your ideas with high precision on a computer.
2. CAM, or Computer-Aided Manufacturing, helps you to convert those drawings into toolpaths that a computer will understand.
3. GRBL is the machine language that brings those paths to life.
4. Gsender is the computer user interface that allows you to speak to or control your CNC machine.
Both CAD and CAM are in no way even remotely intuitive! You have to learn each as a separate software program. Helpfully, each process is presented to you on the computer screen for your appraisal. During simulation tryouts, your trial Toolpaths are displayed on a 3D screen for assessment.
Having completed processes 1 and 2, one is now confronted with a third software that enables the computer to understand the cutting and machining instructions within the CAM software! The so-called Grbl machine code program is installed on your computer. My next choice, to manage those code files from the computer screen, was called Gsender, which is current and has excellent backup from its maker….Oh dear, more software to learn with pitfalls and potholes every step of the way.
“At 79 years of age, you’d think I should know better!
But honestly, I’m having the time of my life”.
~~~~~~~~~~~~~~~~~~~~~
MY CNC JOURNEY THUS FAR….(Continued p3)
A New CNC In My Workshop
“With a head full of new-hobby enthusiasm, I wandered into my workshop to find a suitable home for my incoming CNC machine. The workshop space—roughly 30 by 12 feet (9m x 3.6m)—had already endured years of being reorganised, squeezed, and reconfigured as my collection of woodworking machinery steadily grew.”
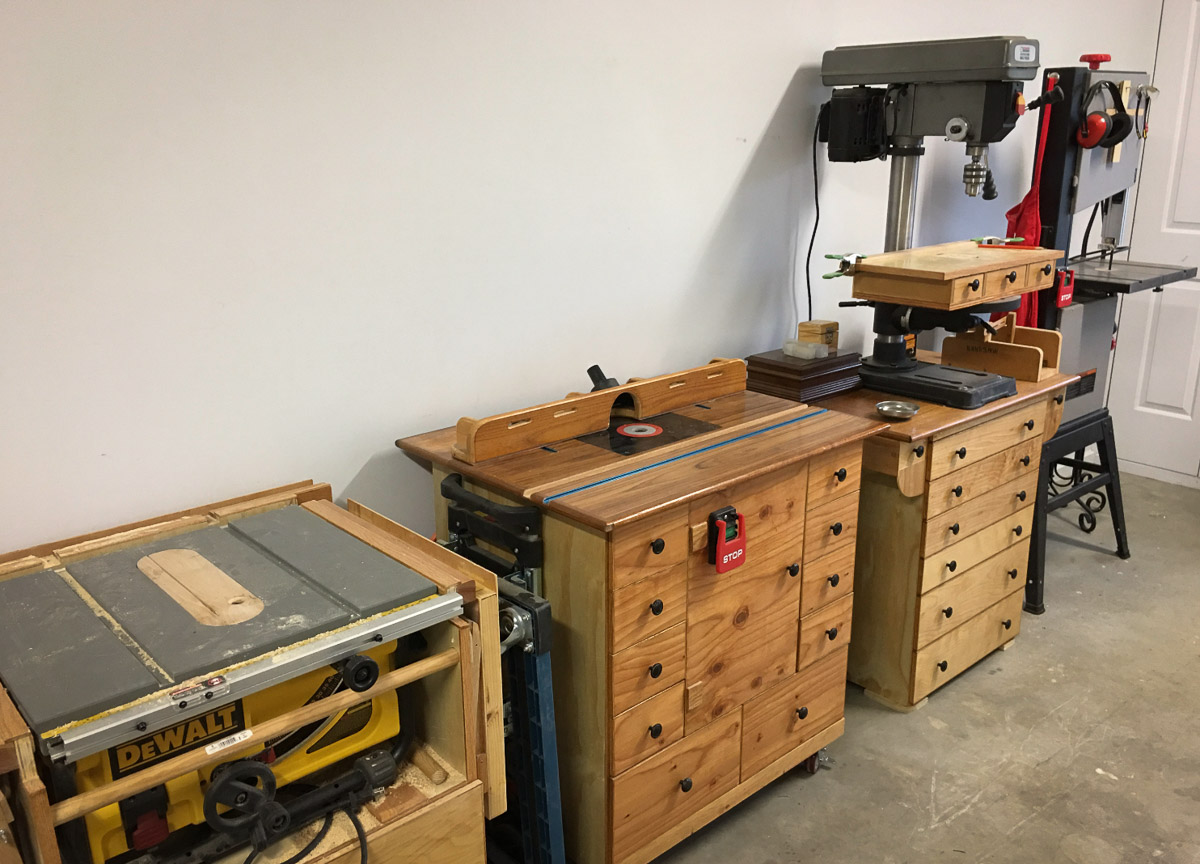
At right is a picture of some cupboards and drawer units I had previously built.
My accumulation of equipment had an unusual history. After living in the United States for almost a decade, I returned to Australia with a sizeable assortment of 110-volt hand tools and bench machines—items I was reluctant to sell for a fraction of their value before moving home. Among them were a floor-mounted drill press, a 14″ bandsaw, a 12″ planer, a full-sized dust collection system, a high-quality shop vac, a DeWalt table saw, a 10″ mitre saw, a TIG welder, an industrial spray painter, an air compressor, three routers, and a generous assortment of smaller tools. Fortunately, the bandsaw and compressor were dual-voltage, and the welder was already 220 volts.
The economics alone justified keeping them. A tool costing USD 100 in the United States could often sell second-hand for USD 30—yet an equivalent model in Australia might cost AUD 300 or more. That kind of disparity, multiplied across fifteen major tools, made it far more sensible to buy a pair of step-up/step-down transformers while still in the US. Those, too, were considerably cheaper over there.
Upon returning to Australia in 2019, I set up the workshop with my upcoming home renovations in mind. Tools and benches lined both side walls, leaving a central area for movement. One entire side was dedicated to 110-volt equipment powered through a large transformer, while the opposite side housed my 220-volt tools. A wide window at the far end provided the perfect location for a 2-metre workbench, complete with built-in storage on both sides.
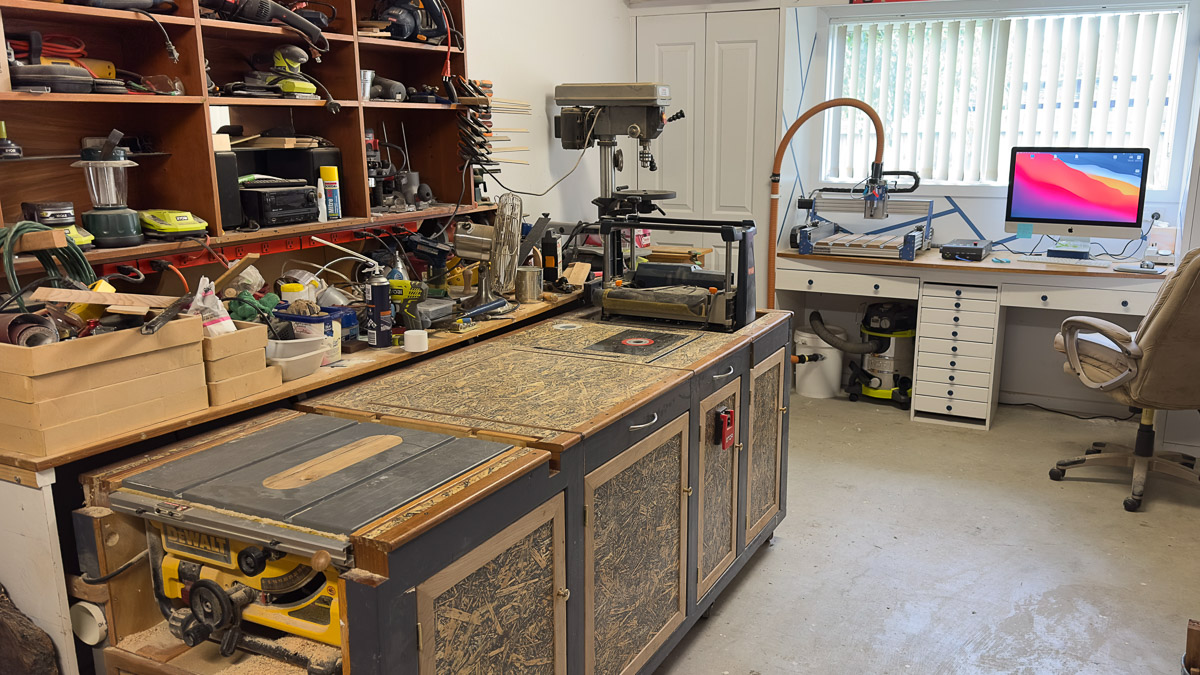
One addition (here at left) was a 750 mm wide by 2300 mm long mobile bench that supported my table saw at one end and a roll-up planer mounted at the other. The remaining surface served as out-feed support for both machines. At the centre, I installed my Triton router, which has an integrated lift mechanism. All three tools could be lowered individually below the bench-top surface, creating a large, multipurpose work surface.
Over time, I added more 220-volt machines—a thicknesser, a bobbin sander, and several smaller pieces of equipment—each competing for limited floor space. To maintain some semblance of order, I built additional benches, mounted everything on castors, and embraced maximum mobility within the workshop.
Another bench—a dedicated slab-surfacing station—housed my large variable-speed Porter-Cable router. I built an extremely stiff 200mm thick torsion-box base from 18 mm MDF, fitted with 40 × 40 mm aluminium rails and a smooth-rolling carriage. This setup allowed surfacing across 750 mm of width with an open-ended length of 2.4 m. Armed with a 38 mm surfacing bit, the bench proved extremely capable. Even my 10″ Ryobi mitre saw found a semi-permanent home on top of the torsion box with in-feed and out-feed support.
Before leaving the US, I had purchased a 12-socket 110-volt power bar—perfect for running multiple tools from a single transformer, though used strictly one at a time to avoid overloading. A similar arrangement existed above my mitre saw and slab-surfacing bench.
And that brought me to a new problem: Where would the CNC go?
~~~~~~~~~~~~~~~~~~~~
MY CNC JOURNEY THUS FAR….(Continued p4)
Unboxing the Machine
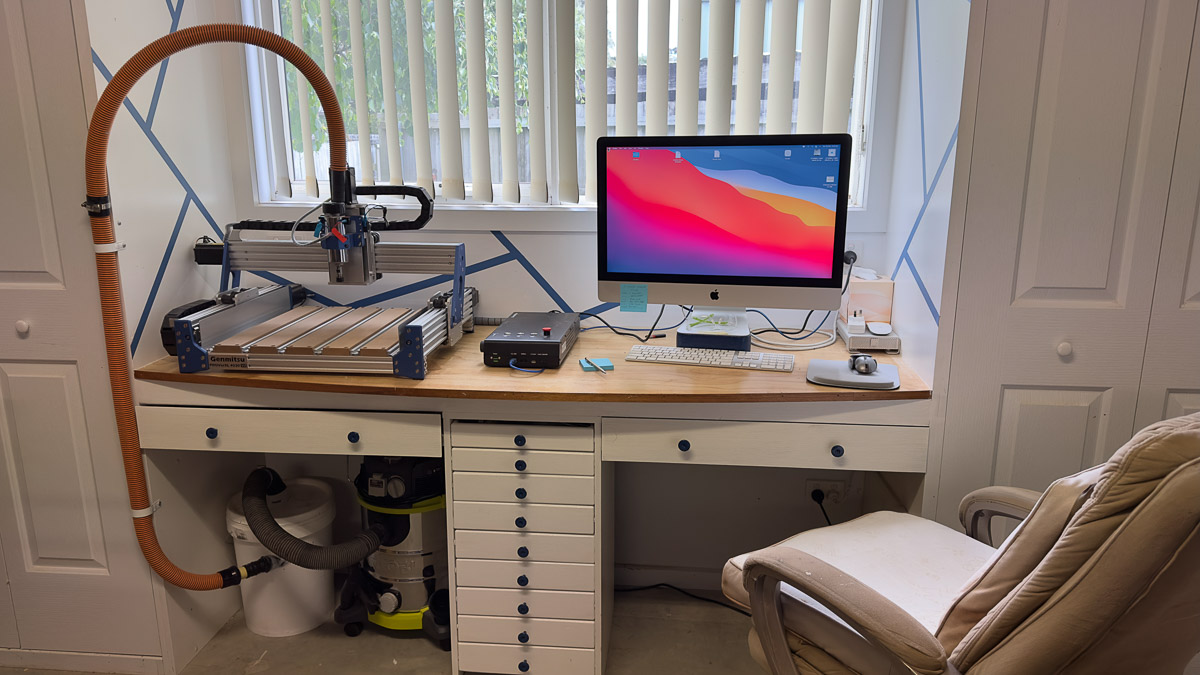
“The long bench beneath the workshop window had become a cluttered and mostly unused space, festooned with magnetic tool bars and odds and ends. But with some imagination—and a bit of elbow grease—it revealed its potential. The CNC would sit neatly on one side, while my older 27″ iMac could occupy the other. A perfect pairing.”
The clutter was cleared, the nook repainted, and the bench freshly varnished. My electrician installed two double power outlets and an Ethernet connection running directly from the home router. New drawers slid into place, and a shop vac, with piping to the CNC dust shoe, took up residence underneath for dust collection.
And just like that, the perfect home for my new CNC machine emerged—clean, organised, and ready for the adventures ahead.
At last, the day arrived. My new CNC machine had arrived and was sitting before me in its delivery carton, almost grinning from inside the packaging—as though it knew it had claimed the best seat in the workshop and was simply waiting for me to unbox.
Two days later, unable to resist any longer, I gave in to the inevitable. With an impatient grip on a box cutter and the enthusiasm of a child on Christmas morning, I opened the box and revealed its contents to the world.
The first surprise was its sheer weight. This was no lightweight hobby trinket—this was a serious machine. But excitement outweighs kilograms, and I soon had all the components, along with an impressively arranged wiring loom, carefully laid out across the bench. The main assembly required a deliberate heave to lift into place, but once there, it sat solidly, as though claiming its territory.
To my pleasant relief, the instructions were clear and well-presented. Within an hour, the machine was fully assembled. I moved around it methodically, checking every bolt, screw, and bracket to ensure nothing had loosened during shipment. Everything felt reassuringly precise.
The manual then hurried me toward the traditional first project: a small nameplate engraved with the manufacturer’s logo. A friendly gesture—but I wasn’t ready to march so confidently into potential chaos. I had no intention of becoming another over-eager beginner who launches straight into their first cut, only to end up with a broken bit, a smoking spindle, or a plume of confusion rising from the workbench.
No—this was a machine deserving of respect. And I intended to learn it properly before asking it to carve even a single line.
~~~~~~~~~~~~~~~~~~~
MY CNC JOURNEY THUS FAR….(Continued p5)
CNC – Self-Paced Learning Indeed!
“For the next couple of weeks, I wrestled with that steep learning curve—partial successes here, patches of confusion there, jargon tumbling around in my head, and my less-than-stellar short-term memory doing me no favours. I found myself constantly cross-checking, back-checking, and re-checking various nuggets of information. All the while, realising I needed to bring some order to my somewhat rambling approach to four separate strands of self-teaching.”
Part of the early chaos came from not understanding how the information I was absorbing would lead into the next piece of software… or the one after that! Had I bitten off more than I could chew? Would I eventually break through this barrier?
I reminded myself that I am, after all, a reasonably intelligent older fellow with time on my hands and a stubborn determination to succeed. And as the old English attitude goes: when things get difficult, sit down with a cup of tea, and think about it.
That inevitable turning point came—guided, as it often is, by that very cuppa—and it pointed me toward the one piece of software I had used before. SketchUp.
I’d used SketchUp for years to sketch simple bench plans and map out renovation layouts. It wasn’t much like Carbide Create’s CAD tools, but it did give me a familiar foothold—a place to stand while staring into the maze ahead. Soon enough, new words began taking up residence in my daily thoughts: polygons, vectors, circular arrays, node editing, and a whole glossary of drafting terms I’d barely known existed.
But there I was, drawing anything from a lone circle to a small cluster of shapes, nudging nodes into place, experimenting with layouts. And then, with a single click, I could step into the Toolpath world and decide how those vectors would come to life: a pocket, a contour, even a perfectly placed screw hole… all with mind-boggling precision, down to 0.01 mm. One hundredth of a millimetre! How minuscule is that? I took a sheet of copy paper from my printer, and according to my digital calliper, it was 0.1mm thick! That’s one tenth of a millimetre, but wait! The CNC refines down to one hundredth of a millimetre! Is that even possible?
Slowly, through each late-night session and each small victory, the fog began to lift. The concepts started to stick. Things began to make sense. And before I knew it, I was actually getting somewhere.
I was finally on my way!
~~~~~~~~~~~~~~~~~~~
MY CNC JOURNEY THUS FAR….(Continued p6)
Feeds and Speeds
To break up the grind, I’d occasionally wander off into the digital wilderness of YouTube, peeking at their higher-end CNC offerings. There, among the sleek monsters and their confident operators, I was guilty of that old sin: trying to run before I could even wobble my way into a walk. The learned brethren would shake their heads knowingly at such folly—yet I lurked on, hoping some of their wisdom would seep through the screen.
On one such forbidden excursion, I stumbled upon a discussion about “Speeds and Feeds.” Little did I know this innocent moment would soon grow into a personal stumbling block of epic proportions. A vague, ever-shifting constellation of numbers, charts, and terminology—RPM, feed rate, depth of cut—all supposedly converging toward something called chip load. The Holy Grail of cutting, apparently.
I listened intently, hoping—praying—for a nugget that might burn off even a small corner of my fog. But then came the moment that nearly broke me: two entirely different sets of numbers were shown, both claiming to achieve the same chip load… yet one set was “wrong.” Wrong how? Wrong why? Wrong according to whom?
And suddenly, for the first time, a tiny spark of hope flickered—because it became obvious that someone else in the audience was just as confused as I was.

When a spinning router bit meets a slab of wood, it doesn’t create dust—it produces ‘chips‘. These chips get flung clear of the cutter and are later swept or vacuumed away. But their size matters! Get chips that are too small, and the spinning bit polishes the wood rather than cutting it, which leads to heat buildup and clogging. Produce chips that are too large, and the cutter suddenly fights the material, inviting chatter, stalling, or a snapped bit. Both extremes mean trouble.
So how do you control chip size?
By adjusting several CNC parameters:
- Spindle RPM
- Depth of Cut (DOC) per pass.
- Feed rate—the speed the bit travels across the work (mm/min or in/min)
- Bit diameter
- Number of flutes
The paradox lies in deciding which of these five variables to change, and by how much, to land at the right chipload—and what that chipload should even be for a given material. The deeper I dug, the clearer it became: I needed a proper Chipload Calculator, something that took three core inputs and cross-referenced them against a chart of recommended chiploads for various materials and bit sizes.
A Proper Chipload Calculator???
~~~~~~~~~~~~~~~~~~~~~
MY CNC JOURNEY THUS FAR….(Continued p7)
‘Chipload Calculator Dashboard’
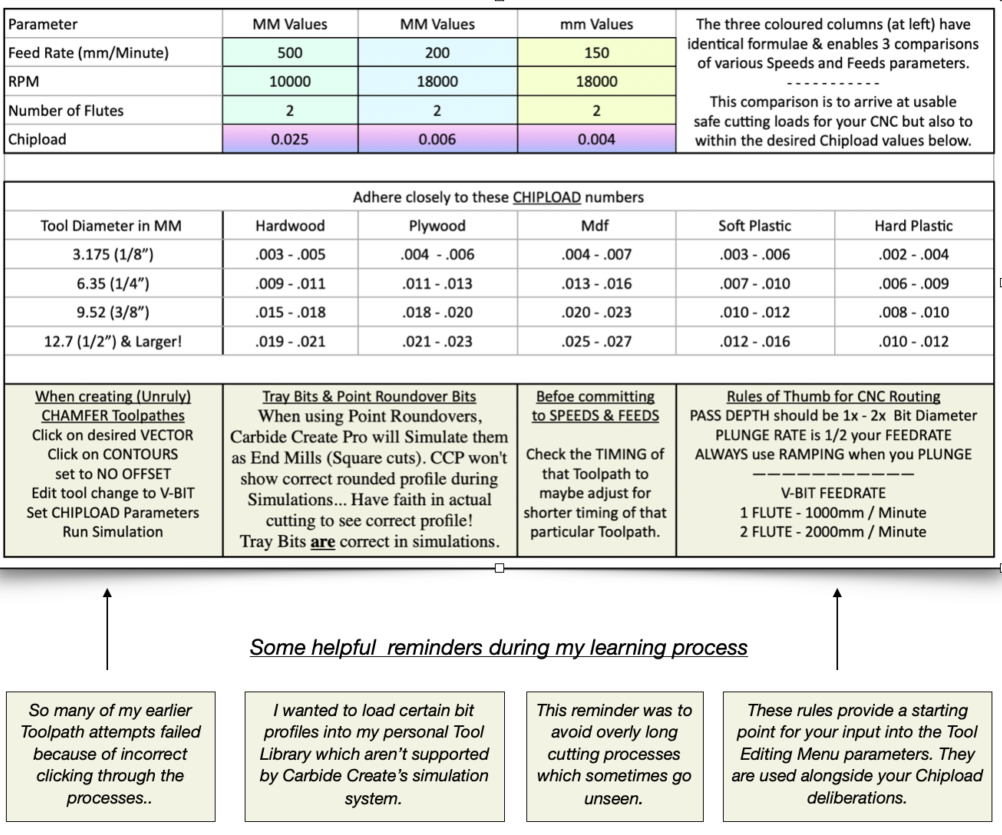
The picture (above) is a screenshot of my actual working calculator with some advice boxes!
“With help from several generous YouTubers—especially Ryan at CIC—and my helpful friend Makif, I finally built what I now call my Chipload Calculator Dashboard, complete with several info boxes that gently nudge me toward better decisions. In the lower-right corner sits a panel titled “Rules of Thumb for CNC Routing”, which should absolutely be considered Essential Reading before using the calculator.
~~~~~~~~~~~~~~~~~~~
MY CNC JOURNEY THUS FAR….(Continued p8)
The Buying Begins
“During my introduction to the world of CNCs—of trolling through countless AliExpress listings, of wading through a mind-numbing number of good (and not so good) YouTube videos, and of applying myself intensely to the required software—I’ve stumbled upon several fairly profound, if simplified, nuggets of advice.”
My interest in CNC routers soon spilled over into the similar world of small “hobby” lathes. I could see how these two engineering domains were, in many ways, spiritual cousins: both obsessed with tight tolerances, computer control, and that ever-elusive mastery of feeds and speeds. Both have fiercely loyal followings, each with its own corners of the internet. And the advice that applies to one almost always applies to the other.
Two of the most commonly whispered truths in those circles are:
“Buy your second machine first.”
and
“Expect your budget to almost double once you add all the tools, accessories, and consumables you’ll eventually need.”
These are the quiet truths shared by people who’ve already taken the longer, scenic route.
As I dug further into the capabilities of my chosen ‘first’ machine, I realised the manufacturer had already upgraded the V2 model beyond many of its competitors’. Two areas still tempted me toward that “second machine” tier: footprint and spindle.
The footprint, unfortunately, was immovable. Workshop space is finite, and stretching the budget for a physically larger unit wasn’t realistic.
But the spindle—that was an upgrade within reach. Especially since I was keen to work more with hardwoods. More power and higher RPMs would put hardwood machining well within my grasp. And the conversion itself was relatively simple, assuming I chose the right path.
One option promised more power for less money: swapping to a regular DeWalt or Genmitsu router. Both would run the machine, both would cut hardwoods… and both were extremely noisy, with the added annoyance of manual on/off switching and physical speed dials.
The second option was far more enticing: an air-cooled spindle paired with a Variable Frequency Drive control box—available, unsurprisingly, from our industrious Chinese friends on Alibaba or AliExpress.
Once again, I sent my money, this time to Alibaba, and waited!
Unfortunately, this marked yet another forthcoming steep learning curve—this time diving headfirst into the world of wiring puzzles and the mysterious realm of editable Function Parameters inside the VFD’s control box. These settings governed everything from disabling reverse-rotation on the spindle to deciding where input signals would originate (the computer keyboard, for example).
In front of me sat roughly 40 parameters, each one requiring attention, interpretation, and a firm decision about how the machine should behave. All of this, of course, presupposed that I actually knew what I was doing. Spoiler: I didn’t.
So, back I went to the sages of YouTube. The Chinese instruction manual—while impressively thorough and surprisingly well translated—spanned 109 pages and assumed a level of prior knowledge I most certainly did not possess.
Like I said…Another learning curve!
~~~~~~~~~~~~~~~~~
MY CNC JOURNEY THUS FAR….(Continued p9)
“My designs Have Started“
As my knowledge of CAD software improved, I found myself imagining—often quite vividly—what I actually wanted to build with my CNC. The internet is awash with “beginner-friendly” plans: name plaques, inspirational signs, Home Sweet Home wall hangings, shallow trays, coasters, knick-knacks. All perfectly fine.
But then someone close to me asked a deceptively simple question:
“Where are you going to put them?” And that stopped me for a moment.
Usefulness versus pretty versus challenging… it was a three-way tug-of-war. I didn’t just want to make something for the sake of making it. I wanted to create pieces that earned their place—objects that were functional, pleasing, and, ideally, just tricky enough to stretch my skills without breaking them.
The versatility and power of my small CNC quickly became apparent. For its size, nothing in its class could touch it. Even the spoilboard stood out: a stiff, well-engineered base with built-in aluminium T-tracks, able to clamp down almost any-sized workpiece without fuss.
Along the way, I came across several videos demonstrating more specialised spoilboard setups—systems designed to hold multiple segments of a project in precisely the same position every time. I could remove one piece, then place the next piece in the same position. Seeing that level of accuracy and repeatability opened my eyes to what was truly possible.
Within a couple of weeks, I’d designed a fun alternative spoilboard in Carbide Create. Cut from 18 mm MDF and pushed right out to the machine’s full work area, it featured eight dog holes arranged in an L-shape along the left side and bottom edge. The two holes at the far ends of the bottom row went all the way through into the original spoilboard, allowing me to “lock” the new board firmly and repeatably in place with dogs. Those dogs in this case were short pieces cut from a 1 m length of 15mm x 1 m PVC pressure pipe.
I laid out a clean grid pattern with engraved lines and corresponding measurements, and added a bit of inspirational text to give the surface some character. Six tiny through-holes provide access to the threaded inserts underneath for light hold-downs, while eight additional threaded inserts set into the new spoilboard offer flexible clamping positions for smaller workpieces. A final tiny hole was placed in the ‘absolute’ bottom left corner of where the workpiece would sit, finishing my new spoilboard.
Over the top? Well, maybe!
~~~~~~~~~~~~~~~~~~~

And finally, I went one step further…
Each time I entered my workshop, I was confronted by my CNC setup, its bench space all freshly painted, cool and composed. Yet all of it was preceded by a poorly presented, spotty concrete workshop floor. You guessed it…
Over the coming days, I set about a custom refurbishment of that vision.
- Day 1 – I scraped and cleaned the concrete surface.
- Day 2 – I then acid-washed the concrete and left it to dry.
- Day 3 – Found me at Bunnings buying their epoxy resurfacing kit.
- Day 3 – $350 for a 2-car garage size in Light Grey with Blue surface sprinkles…
- Day 4 – Masking off all the skirting, then a 250mm roller and a 50mm cut-in brush.
While following this progress, there was the continued jostling of workshop equipment…
At 79, this whole effort was a serious impediment to my daily comfort.
By lunchtime each day I was exhausted, still stubbornly upright, and truly buggered.
But…What a difference, clean, elegant, and worth the effort!
~~~~~~~~~~~~~~~~~~
Your thoughts or reflective comments are welcome and encouraged
~~~~~~~~~~~~~~~~~~
Logged in as admin. Edit your profile. Log out? Required fields are marked *. Type here..
Copyright © 2026 Magazine Test | Powered by Astra WordPress Theme